How Can We Help You?
Find answers to common questions and learn how to make the most of WebsiteScreenshot.io
Sign Up Process
To create an account on Index Checker, follow these simple steps:
1. Visit the Registration Page
2. Choose Your Preferred Sign-Up Method
Standard Registration: Enter your name, email address, and password to create an account manually.
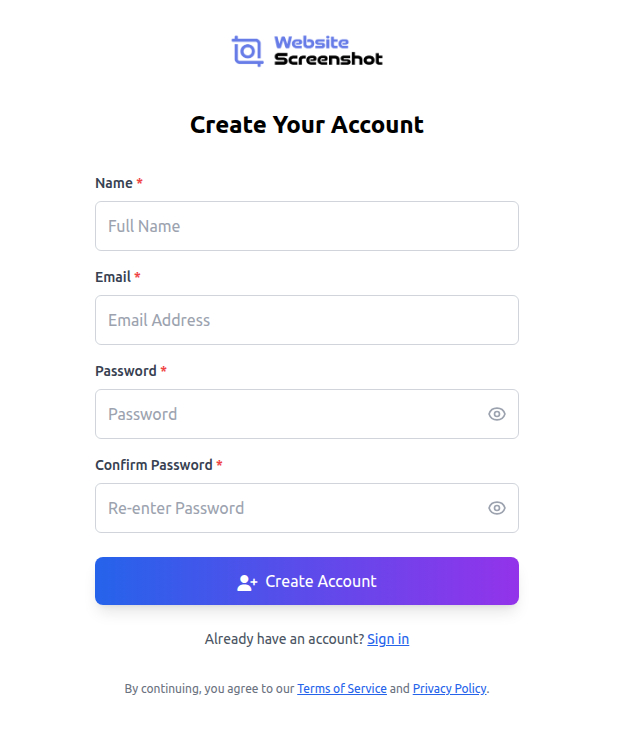
3. Enter Your Details
- Name – Used for your account profile.
- Email Address – This will be your login ID.
- Password – Must be at least 8 characters, with 1 uppercase, 1 lowercase, and 1 number.
Now, your account will be fully activated and ready to use.
Website Screenshot
Overview
Website Screenshot is an online tool that lets you capture high-quality screenshots of any public webpage. Whether you need a quick preview, a marketing image, or an archive of a webpage, you can do it in one click — without installing any extensions or software.
How to Take a Screenshot
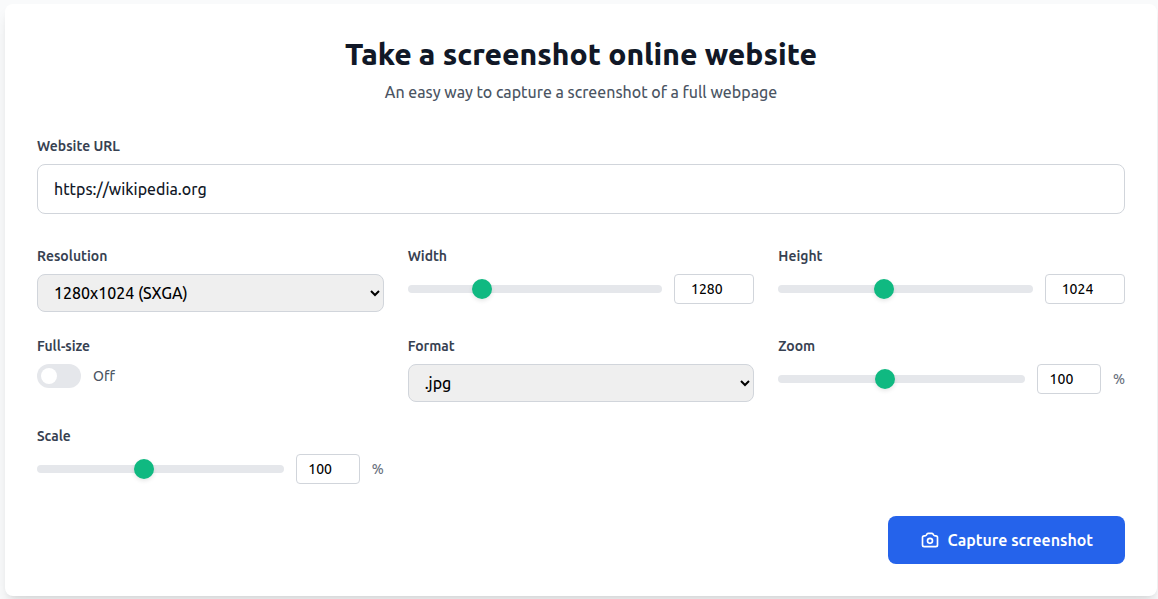
Step 1 – Navigate to "Take a Screenshot"
On the left sidebar, click Take a Screenshot.
Step 2 – Enter the Website URL
In the Website URL field, paste the full URL of the website you want to capture (e.g., https://wikipedia.org).
Step 3 – Choose Screenshot Settings
🖥️ Resolution
Pick from preset resolutions like:
- 1024×768 (XGA)
- 1280×1024 (SXGA)
- 1920×1080 (Full HD)
- 2560×1440 (QHD)
📏 Width & Height
Adjust manually using the sliders or number fields.
📂 Format
Choose your desired output:
- .jpg for smaller file size
- .png for high quality
- .webp for modern web optimization
🔍 Zoom & Scale
Zoom controls how much the page is enlarged before capture.
Scale adjusts the final image proportion (use 100% for true scale).
🧩 Full-Size Mode
Toggle Full-Size ON to capture the entire webpage — including parts that normally require scrolling.
Step 4 – Capture
Once settings are ready, click 📸 Capture Screenshot.
The app will process the webpage and generate the image automatically.
You'll see a status such as "Screenshot Captured Successfully."
📂 Viewing & Managing Screenshots
After a capture, you'll be redirected to the Screenshot Details page:
Screenshot Preview
Displays your generated image with options to:
- Download
- Back to Gallery
- View Screenshot Info
🖼️ Screenshots Gallery
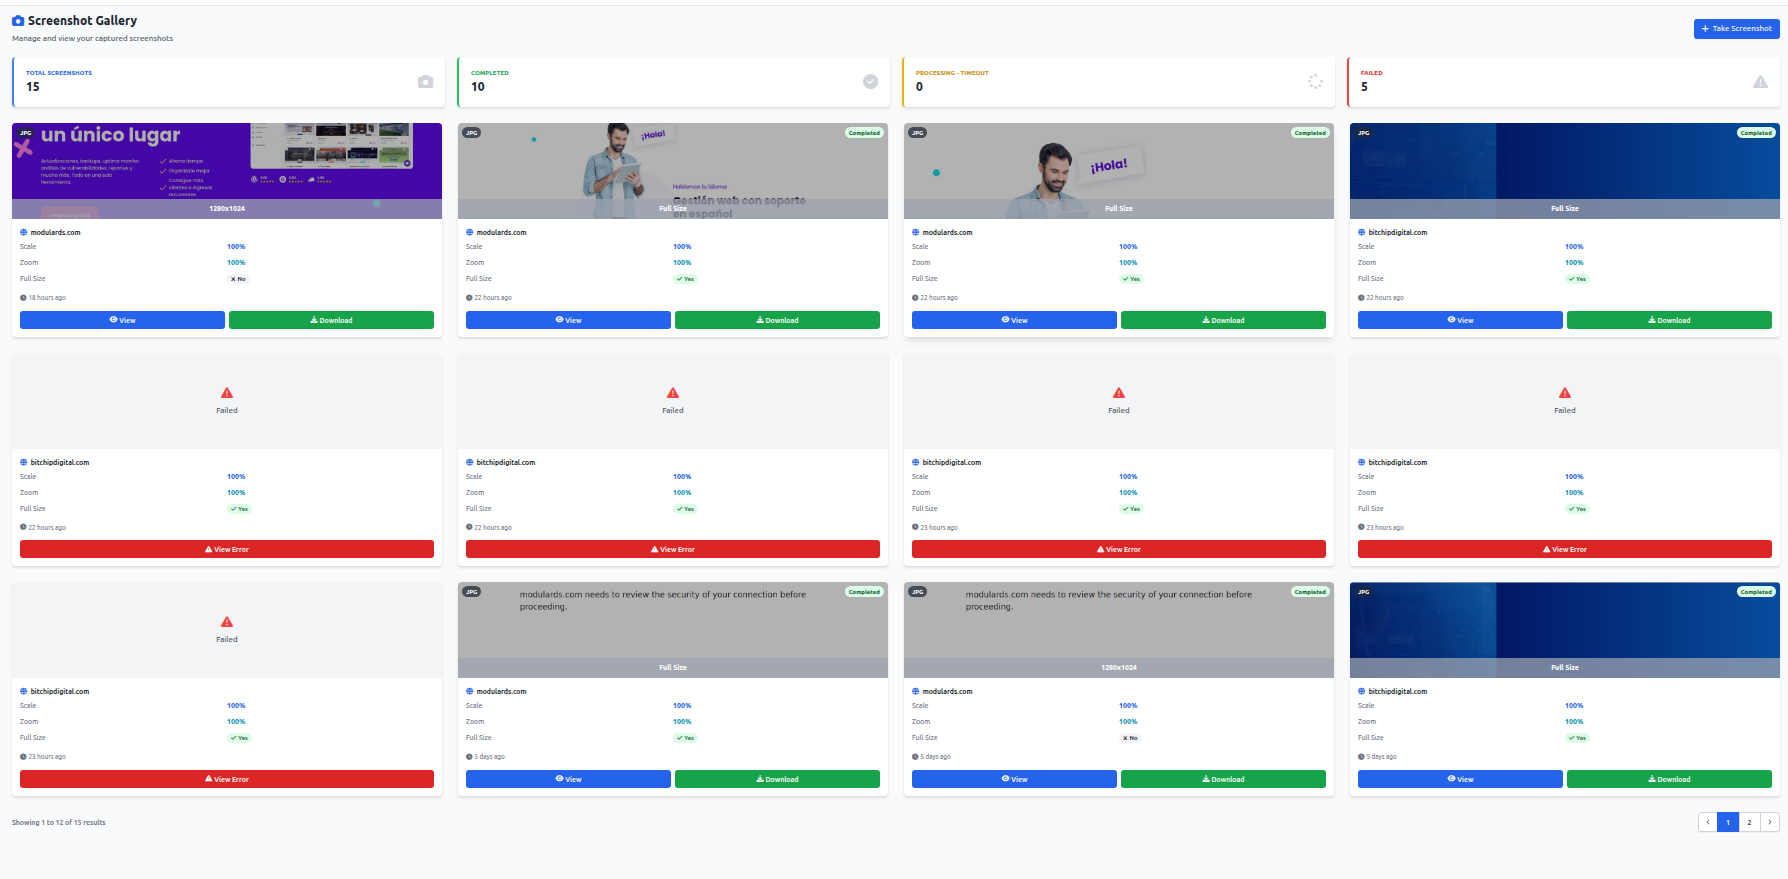
All your captured screenshots are automatically saved in the Screenshots Gallery. Here you can:
- Preview each screenshot
- Download images
- Delete unwanted ones
- Filter by date, format, or resolution
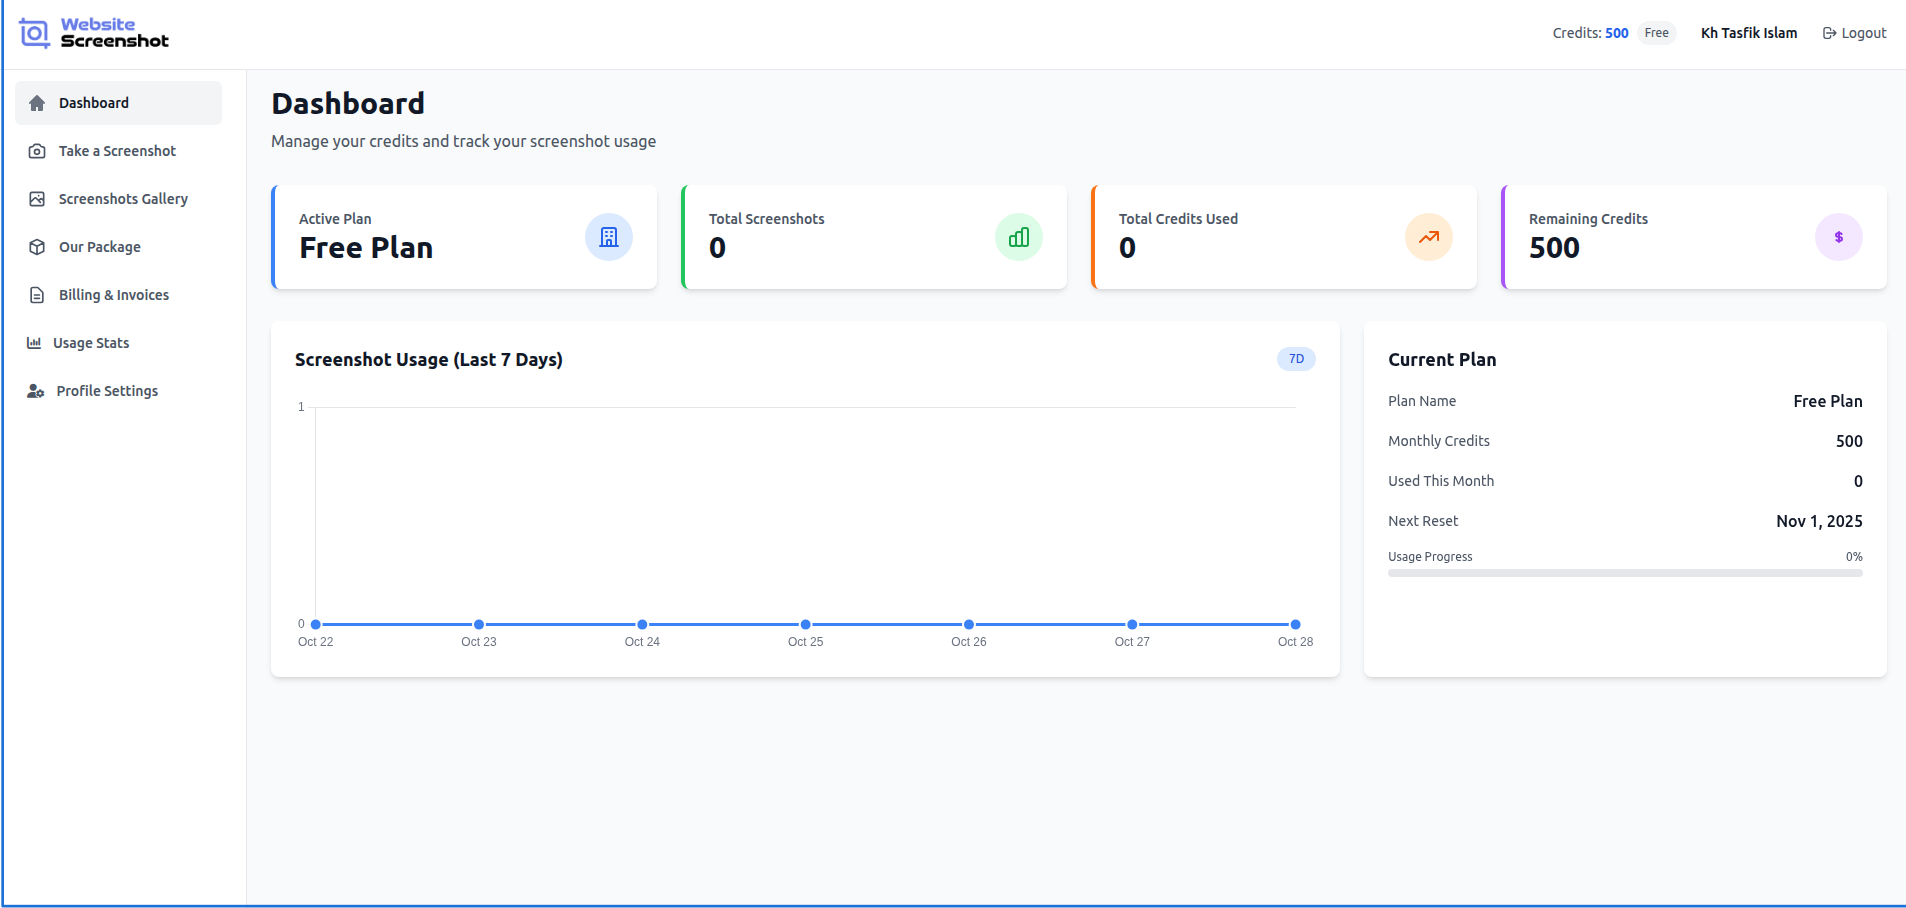
💳 Billing & Usage
Under Billing & Invoices, you can:
- Check your remaining credits
- View past invoices
- Upgrade your package
The Usage Stats tab shows:
- Total screenshots taken
- Credit consumption
🧠 Tips & Best Practices
- Use Full-Size Mode for long-form pages or scrolling content.
- Choose PNG for high-fidelity screenshots (e.g., UI/UX or design review).
- Choose JPG for smaller file size (e.g., reports or archives).
- Adjust Zoom + Scale if your screenshot cuts off important areas.
- Check your Credits before large batch captures.
Usage Stats
The Usage Stats page helps you track your activity within the Website Screenshot app over the past 12 months.
It's a visual report of how many screenshots you've taken — perfect for monitoring credit consumption, performance, and usage behavior.

Overview
At the top of the page, you'll find a chart titled:
"Screenshots per Month (Last 12 months)"
This line chart displays:
- The number of screenshots taken each month.
- The growth trend of your activity.
- A 12-month timeline that updates automatically.
🔹 Data Breakdown
| Element | Description |
| Horizontal Axis (X) | Shows the months from the past year (e.g., Nov 2024 – Oct 2025). |
| Vertical Axis (Y) | Represents the number of screenshots taken per month. |
| Blue Line Graph | Indicates your monthly screenshot count trend. |
| Tooltip / Data Point | Hover over points to view the exact screenshot count for that month. |
💡 The graph updates in real-time whenever new screenshots are captured.
🔹 Insights You Can Gain
- Identify usage peaks (months with the most captures).
- Monitor credit consumption and predict when to upgrade your plan.
- Track long-term activity trends to evaluate how often you or your team use the service.
🔹 Use Case Example
If you notice a spike in October 2025, it means you captured significantly more screenshots that month — possibly due to new projects or reports. This insight helps manage future workload and optimize plan usage.
🔹 Data Privacy
All analytics shown in Usage Stats are personal to your account. No other user or admin can view your private usage history.
Data is securely processed and stored in compliance with GDPR and internal data protection standards.
Profile Settings
The Profile Settings page allows you to manage your personal account information, password security, and data preferences. It's designed for simplicity, transparency, and complete control over your account.
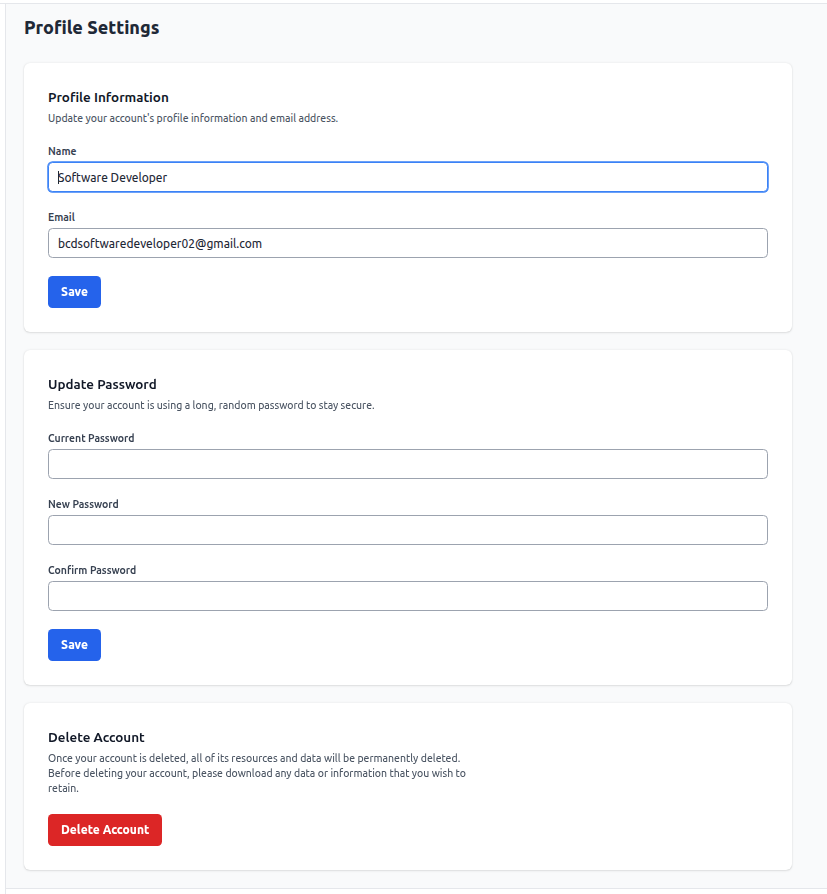
🔹 Profile Information
This section contains your Name and Email linked to your account.
How to update:
- Navigate to Profile Settings from the sidebar menu.
- Under Profile Information, edit your Name or Email as needed.
- Click Save to apply the changes instantly.
💡 Tip: Make sure to use a valid and active email address. All account notifications and password resets are sent here.
🔹 Update Password
Maintaining account security is crucial. This section allows you to reset or update your password at any time.
Steps to change your password:
- In the Update Password section, enter your Current Password.
- Enter your New Password — use a strong combination of letters, numbers, and special characters.
- Re-enter the same password in Confirm Password.
- Click Save to update.
⚠️ Important: If your new password doesn't match the confirmation field or doesn't meet security requirements, the system will show an error message.
Best practices for password security:
- Use a minimum of 8 characters.
- Avoid using the same password across multiple sites.
- Change passwords periodically to reduce risk.
🔹 Delete Account
If you choose to permanently delete your account, this option ensures all data and screenshots are securely removed from the system.
Before deleting:
- Download any data, invoices, or screenshots you wish to keep.
- Understand that deletion is irreversible — all information tied to your account will be permanently erased.
How to delete your account:
- Scroll to the Delete Account section.
- Click the Delete Account button.
- Confirm the deletion when prompted.
⚠️ Once deleted, your credits, screenshots, and billing history cannot be recovered.
Frequently Asked Questions
Quick answers to common questions about our service
To create an account, visit our registration page at https://app.websitescreenshot.io/register and fill in your name, email address, and password. Your account will be activated immediately after registration.
We support three main file formats: JPG for smaller file sizes, PNG for high-quality images, and WebP for modern web optimization. You can choose your preferred format in the screenshot settings before capturing.
You can check your remaining credits in the Billing & Invoices section of your dashboard. The Usage Stats page also provides detailed information about your credit consumption patterns.
Yes, you can change your email address in the Profile Settings section. Simply navigate to Profile Settings, update your email in the Profile Information section, and click Save to apply the changes.
Account deletion is permanent and irreversible. All your data, including screenshots, credits, billing history, and personal information will be permanently removed from our system. Make sure to download any important data before deleting your account.
You can upgrade your plan in the Billing & Invoices section. Choose from our available plans and follow the upgrade process. Your new plan features will be activated immediately after payment.